
I used to think pavilions were just fancy gazebos rich people put in their yards to feel European.
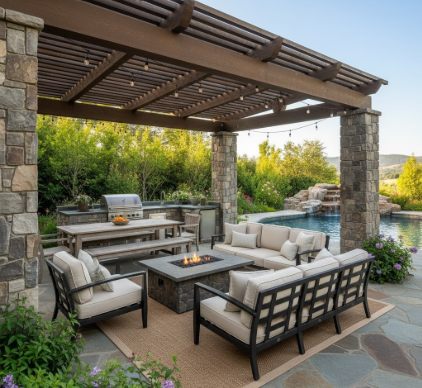
Turns out—and this took me embarassingly long to figure out—pavilion-style outdoor spaces are actually one of the most versatile architectural solutions for entertainment areas, combining the permanence of a structure with the openness of, well, being outside. The concept dates back centuries, showing up in Persian gardens around the 6th century BCE and later in Chinese imperial courtyards where they served as transitional spaces between formal indoor rooms and wild outdoor landscapes. Modern interpretations keep that liminal quality but add things like weather-resistant materials, integrated lighting systems, and honestly sometimes way too many speakers. What makes them work for entertainment isn’t the roof alone—it’s how the roof creates a psychological boundary without walls, giving guests a defined gathering zone while maintaining sightlines to the rest of the property. I’ve seen people spend forty thousand dollars on a pavilion and then never use it because they positioned it wrong, which brings me to the first real consideration.
Site selection matters more than the structure itself, and I mean that. You want a spot that balances accessibility with destination—close enough to the house that carrying food and drinks doesn’t feel like a expedition, but far enough that it feels like an event. Consider sun patterns throughout the day since even a roofed pavilion can get uncomfortably hot if it’s catching western sun at 4 PM in July.
Anyway, the structural design phase is where most people either nail it or create an expensive mistake.
Pavilion dimensions should match your typical gathering size plus roughly thirty percent—so if you usually host twelve people, design for sixteen to avoid that cramped feeling when someone brings unexpected guests. Roof pitch matters more than you’d think; a 4:12 slope (four inches of rise for every twelve inches of horizontal run) sheds rain effectively while keeping the structure from looking too barn-like, though some contemporary designs go flatter for a sleeker profile. Post placement defines traffic flow, so position them to create natural pathways rather than obstacles—I’ve walked into more pavilion posts at dusk than I care to admit. Material choices here get complicated fast: timber framing offers warmth and traditional aesthetics but requires maintenance every few years with sealant or stain, while powder-coated aluminum or steel provides durability with less upkeep but can feel industrial if you’re not careful with the design. Cedar and redwood naturally resist rot and insects, making them popular for exposed applications, though they’ll weather to gray unless treated. The thing is, mixing materials often works better than committing to one—maybe steel posts with wood beams, or a metal roof over timber framing.
Wait—maybe I should mention flooring since everyone forgets about it until construction starts.
Flooring choices transform how the space functions and how much maintenance you’ll be doing five years from now. Stamped concrete offers durability and can mimic stone or tile patterns at lower cost, typically running $8-18 per square foot installed depending on complexity and regional labor rates. Natural stone like flagstone or bluestone creates an organic feel that weathers beautifully but costs more upfront ($15-30 per square foot) and requires proper base preparation to prevent settling and frost heave in cold climates. I guess permeable pavers have become popular lately for their drainage benefits and environmental credentials—they allow water to filter through rather than creating runoff, which matters if your property has drainage issues or if local regulations are getting stricter about impermeable surfaces. Some people go with elevated decking using composite materials that resist moisture, fading, and insect damage better than traditional wood, though they can get surprisingly hot underfoot in direct sun. Here’s the thing: whatever you choose needs to handle your climate’s freeze-thaw cycles if applicable, resist staining from dropped food and drinks, and provide enough traction when wet that nobody’s suing you after a dinner party.
The infrastructure layer—utilities and built-ins—separates amateur pavilions from professional-grade entertainment spaces, and this is where budgets tend to explode. Electrical planning should include dedicated circuits for lighting, outlets for catering equipment or sound systems, and possibly ceiling fan hookups since air movement makes humid evenings tolerable. Lighting design deserves its own attention: layered approaches work best with ambient lighting (overhead fixtures or string lights) for general visibility, task lighting over food prep or serving areas, and accent lighting to highlight architectural features or landscaping. I’ve seen people install dimmers on every circuit, which seems excessive until you’re actually using the space and realize how much mood matters. Plumbing access opens possibilities for wet bars, sinks, or even outdoor kitchens, though running water lines and drainage adds significant cost and complexity—expect $2,000-5,000 just for basic plumbing depending on distance from existing lines. Built-in seating along perimeter walls or railings maximizes capacity without cluttering the space with movable furniture, and storage benches serve double duty. Gas lines for grills, fire features, or patio heaters require professional installation and permits but definately extend the seasonal usability of the space into shoulder months when temperatures drop.
Honestly, the whole process takes longer than people expect—permits, weather delays, the usual contractor issues.


