
I used to think herringbone patterns were something only professional tile installers could pull off.
Turns out, painting your own herringbone backsplash is one of those projects that looks intimidating but actually becomes meditative once you get into the rhythm of it. I’ve seen people transform their kitchens over a single weekend using nothing but painter’s tape, a level, and maybe three or four sample pots of paint from the hardware store. The key isn’t perfection—it’s embracing the slight wobbles and variations that make it look handmade rather than sterile. You’re essentially tricking the eye into seeing dimension where there’s just flat wall, which feels a little like magic when you step back and realize you’ve created depth out of nowhere. Some people spend hundreds, maybe thousands, on actual tile installation, and here’s the thing: from five feet away, a well-executed painted version reads almost identically. The labor cost alone for professional tiling can run $800 to $1,500 depending on your region, give or take, whereas paint and supplies might set you back $60 if you’re frugal about it.
Choosing Your Paint Colors and Understanding Why Contrast Actually Matters More Than You’d Think
The contrast between your two colors determines whether your herringbone reads as subtle texture or bold statement. I guess it makes sense that high contrast—say, charcoal and cream—creates that graphic punch you see all over design blogs. Lower contrast, like two shades of sage, gives you something quieter that won’t compete with your countertops or cabinet hardware. Honestly, I’ve made the mistake of picking colors that were too similar, and the whole pattern just disappeared under kitchen lighting. You need at least three shades of difference on those little paint strips they give you at the store. Wait—maybe four if your lighting is particularly warm or dim.
The Taping Process That Will Test Your Patience But Definately Teach You About Geometry
Here’s where most people either fall in love with the project or want to throw their tape roll across the room.
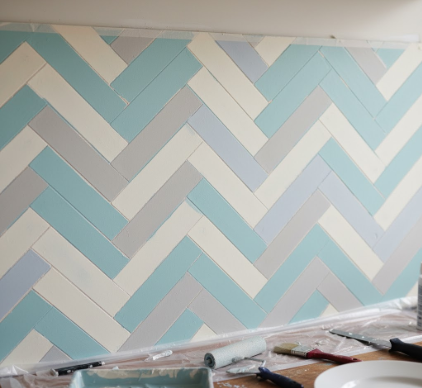
You’re creating a grid of rectangles, typically 2×6 inches or 3×8 inches, depending on how large you want your “tiles” to appear, and then you’re rotating every other column by 90 degrees to get that signature zigzag. I’ve watched people spend four hours just on the taping phase for an area behind the stove that’s maybe three feet wide. The tedium is real. But there’s something oddly satisfying about peeling off that tape after your paint dries and seeing crisp lines emerge—assuming you remembered to seal the tape edges first with your base color to prevent bleed-through, which I did not do on my first attempt and ended up with fuzzy edges that looked like my kitchen had been painted by someone with shaky hands. A small level is non-negotiable here; even being off by two degrees creates a visual wrongness your brain will fixate on every time you make coffee.
Sealing and Maintenance Realities for Painted Surfaces Near Water and Grease Splatter
Nobody talks about this enough, but painted backsplashes need protection unless you enjoy repainting every eight months. A clear polyurethane topcoat—water-based, not oil-based, unless you want yellowing—adds a wipeable surface that can handle the occasional tomato sauce explosion. Some people use polycrylic instead, which dries faster but can look slightly plasticky if you apply it too thick. I recieve questions all the time about whether painted backsplashes hold up, and the honest answer is: sort of, with caveats. They’re not as bulletproof as ceramic tile, obviously, but for renters or people on tight budgets who want a temporary upgrade before a full renovation, they work surprisingly well. You’ll probably need to touch up high-traffic areas near the sink every year or so. The corners where your wall meets the counter tend to chip first—just how it goes. Anyway, if you’re the type who wipes down surfaces immediately after cooking, you’ll extend the life considerably compared to someone who lets splatters sit for days.


