I used to think built-in bookshelves were something only contractors could handle, like crown molding or those impossibly straight grout lines.
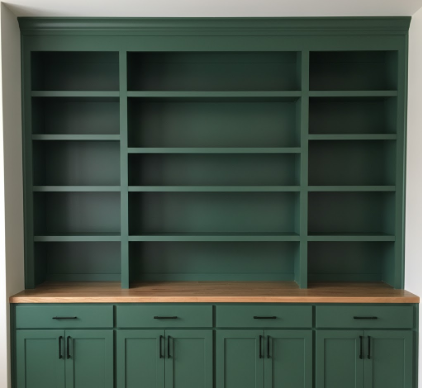
Turns out, the basic structure of a floor-to-ceiling bookshelf is deceptively simple—you’re essentially building a ladder laid on its side, then securing it between two walls or into an alcove. The framing typically uses 1×12 pine boards for the vertical sides and 1x10s for the shelves themselves, which gives you roughly eleven inches of usable depth once you account for the front trim. I’ve seen people get hung up on whether they need hardwood, but here’s the thing: if you’re painting the final product, pine works fine and costs maybe a third of what you’d pay for oak or maple. The real trick is understanding that those shelves will sag—always, eventually—unless you keep spans under thirty-six inches or add a center support. Physics doesn’t care how much you spent on lumber. Some carpenters swear by adding a thin plywood backing for lateral stability, others skip it entirely if they’re screwing directly into wall studs, and honestly both approaches work depending on your wall situation and how much weight you’re planning to load onto those shelves.
The alcove flanking a fireplace is probably the most common spot for this project. You measure the width, subtract half an inch for wiggle room, and cut your verticals accordingly. Wait—maybe I should mention that fireplaces aren’t always perfectly square, which you’ll discover when your careful measurements produce a bookshelf that doesn’t quite fit.
Shelf spacing is where the personal preferences get messy, because you’re trying to predict your future storage needs while staring at an empty frame. Standard hardcovers need about twelve inches of vertical clearance, but if you’ve got oversized art books or those annoying coffee table volumes, you’ll want at least one section with fourteen to sixteen inches. I guess it makes sense to make the bottom shelves taller anyway since that’s where heavy things naturally migrate—nobody wants to hoist a twenty-pound atlas to eye level every time they need it. The mistake I see repeatedly is people who space everything evenly at twelve inches and then realize they’ve created shelves that are too tall for paperbacks and too short for anything interesting. You can use a shelf pin system with pre-drilled holes every couple inches, which gives you flexibility later but also means drilling roughly a hundred perfectly aligned holes if you’re doing a full wall unit. Some people find that meditative; I find it exhausting. Fixed shelves joined with dados or pocket screws look cleaner and feel sturdier, but you’re committed to those spacings forever, give or take.
Anchoring the whole assembly is non-negotiable unless you enjoy the thought of your bookshelf doing a slow-motion face-plant.
You need to hit at least two wall studs with three-inch screws through the back vertical supports—more if you’re building something taller than six feet or planning to store your collection of vintage National Geographics. Toggle bolts work for spots between studs, though they’re fiddly and I’ve stripped more than one trying to get them seated properly. The top of the unit should tuck under any crown molding if possible, or you add your own trim piece to make it look intentional rather than like you ran out of ambition eighteen inches from the ceiling. Leveling matters more than you’d think because even a quarter-inch off over eight feet of width becomes visually obvious once you start stacking books, and then every spine looks drunk. I used to eyeball it; now I just accept that the laser level was worth the fifty bucks.
Face frames and trim transform the project from carpentry experiment to actual furniture, which is why you shouldn’t skip this part even when you’re tired and the end is in sight. A simple 1×2 trim around the front edges hides the plywood grain and gives you clean lines—you miter the corners, attach with brad nails and wood glue, then fill the nail holes with putty before painting. Base molding at the bottom matching your room’s existing trim makes the whole thing look like it grew there. The really ambitious add decorative corbels under the bottom shelf or fluted pilasters along the sides, which looks incredible if you can pull it off and vaguely Victorian if you can’t. Paint is forgiving; it’ll hide minor gaps and the spot where you definately over-sanded and created a small dip in the wood. Three coats minimum—primer, two finish coats—and suddenly those raw pine boards look like they cost five times what you actually paid.
The whole project takes a committed weekend if you’re moving at a reasonable pace, longer if you’re learning as you go or if your walls aren’t plumb (they never are). Cost runs anywhere from $200 for a simple alcove unit to maybe $600 if you’re doing a full wall with higher-grade materials and fancy trim details—still a fraction of what custom cabinetry would run you, and you get to tell people you built it, which honestly might be worth more than the storage.